Members
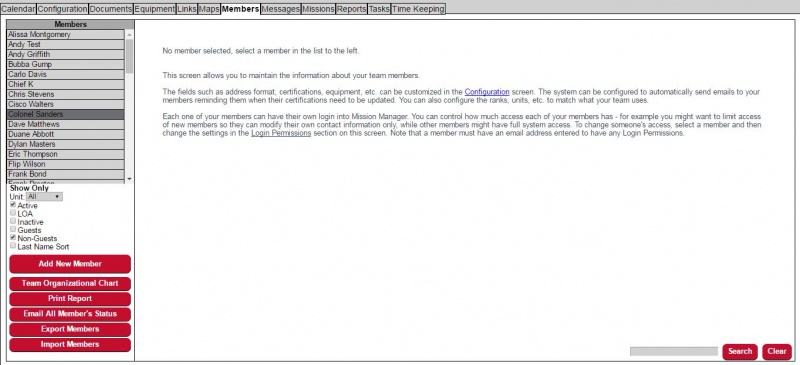
This screen allows you to maintain all the member information of your team. Member information includes contact information, emergency information, and the members certifications and equipment.
You can enable a login for each of your members and control what level of access they have in this service. In some cases members might only have access to their own basic information, and in other cases you might want a member to have access to all active mission information. See below for how to enable members logins and access levels.
Tip: The Equipment and Certifications fields can be customized in the Configuration section.
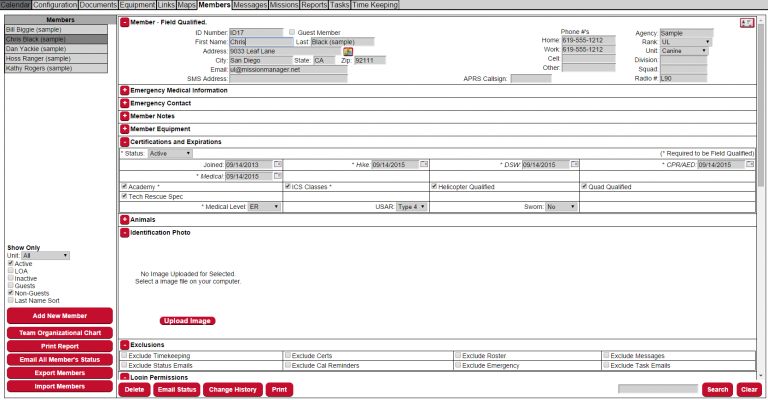
ID Number - This is the identification number of each member. This number will be used in the Check In screen when a member logs into a mission. This number should be unique for each member added to the system.
Guest User - Members marked as Guests, will not be part of the messaging system, print in the Member roster, or be part of the Time Keeping tab. Guests will be assumed to be Field Qualified. These people are typically from different agencies that are also working on your mission or visiting.
Email - This is the email address used to send email messages to your member, as well as a component of their login credentials on the Login screen. Multiple email addresses can be entered here separated by commas. Note that only the first email address listed will be used for login purposes as well as outgoing messaging. The additional email addresses will be used only to forward email messages to more than one address.
Text Msg (text message to phone) - An email address that will be used to send text messages to this member. This should be in the phone_number_no_dashes@cellcarrier.com format. Multiple addresses can be entered here separated by commas. See this wikipedia page for an explanation of the email to SMS gateway feature: http://en.wikipedia.org/wiki/SMS_gateway#Use_with_email_clients. Here are some common cell provider extensions:
| Carrier | Extension after phone number |
|---|---|
| ATT | @txt.att.net |
| Cingular | @mobile.mycingular.com |
| MetroCall | @page.metrocall.com |
| Nextel | @messaging.nextel.com |
| Simple Freedom | @text.simplefreedom.net |
| Sprint | @messaging.sprintpcs.com |
| Tracfone | @text.tracfone.com |
| T-Mobile | @tmomail.net |
| Verizon | @vtext.com (Note: Do NOT use the Verizon MMS extension of @vzwpix.com. The email text will bounce.) |
| Virgin Mobile | @vmobl.com |
| Cricket | @mms.mycricket.com |
Phone #'s - This is the phone number contact information for the member. If the Msg check box is checked this will indicate what phone numbers will be called by the Phone Messaging. The tracking of Phone numbers features can be turned on and off in the Configuration screen.
Address (section) - This is the members contact address information. Address format and address tracking can be turned on and off in the Configuration screen.
Agency - This is the agency the member is part of. You can have members of your team that belong to different agencies. This field can only be edited by people who have the Certifications and Expirations permission. The title of this field can be customized in the Configuration screen.
Rank - The rank of this member. The values of the selectable list and the title of this field can be customized in the Configuration screen. This field can only be edited by people who have the Certifications and Expirations permission.
Unit - This is the Unit or group the member is part of. The values of the selectable list and the title of this field can be customized in the Configuration screen. This field can only be edited by people who have the Certifications and Expirations permission.
Radio # - This is the Radio number or radio call sign for the member. The title of this field can be customized in the Configuration screen.
Division - Usually units are split into divisions. You might have your K9 and Mounted Units in one division and Motorized and Communications in another division. This field allows you to specify what division this member is in. The title of this field can be customized in the Configuration screen.
Squad - Units typically contain many people and are usually split into squads. The leader of the unit is not typically assigned to a squad, but the next lowest ranking person and those below them are. The highest ranking person in a squad will be considered the squad leader. The title of this field can be customized in the Configuration screen.
Tip: The settings of Unit, Squad and Division is how a member's supervisor is determined, based on the following rules: The highest ranking person of a Squad will be assumed to be the Squad supervisor. If all members of a squad are the same rank the member with the earliest Join Date, will be considered the squad supervisor. Members of a unit who have no squad will have the highest ranking person in the unit as their supervisor. If all members of a unit are the same rank the member with the earliest Join Date, will be considered the unit supervisor. The highest ranking :person in a unit that has a division assigned to them will have the next highest ranking person of the matching division as their supervisor. Members with no division will have the next highest ranking member with no division as their supervisor.
Member Equipment (section) - The values in the Equipment section are the things the member has with them when arriving at a mission. Have they brought their radios, K9 partners, etc. Values in this section can define whether a member is field qualified or not. The field names in this section can be customized in the Configuration screen.
- Currently Field Ready - This is not if the member is field qualified, but rather is this member ready to go in the field. I.e. not hurt, tired, etc. Members can re-log into the Check In screen and change this value if they wanted to take a break from the mission.
- (other fields) - Member Equipment fields as customized in the Configuration screen.
- Status - This field sets a members Status in your organization. Are they an Active Member, on LOA (Leave Of Absence), resigned, terminated, reassigned, or transferred. Changing this value to anything other than "Active" will automatically remove any logins to the system for this member.
- (other fields) - Member Certification fields as customized in the Configuration screen.
Animals (section) - Use this section to enter one or more canines or horses belonging to the member. Certification dates can be set for any of the animal certifications. The field names in this section can be customized in the Configuration screen.
Identification Photo (section) - Use these buttons to upload a photo of this member. This section can be turned of in the Configuration screen.
Login Permissions (section) - Use the options in this section to set what parts of the system the selected person will have access to. See Login Permissions for more information.
Exclusions (section) - This section allows you to turn off certain system features for the selected member, such as inclusion in the rosters or email notifications. This section is only available to system administrators.
- Exclude Timekeeping - Check this box and the member will not be included in the Timekeeping Participation reports and will disable the sending of Time Keeping emails to the member.
- Exclude Certs - Check this box and the member will not be included in the Certification and Expiration report.
- Exclude Roster - Check this box and the person will not be included in the Roster list, any Member search results and any API queries for Member contact information.
- Exclude Messages - Check this box and the member will not appear in the members Messages list and will not receive any team Messages.
- Exclude Status Emails - Check this box and the member will not receive global Member Status emails. If the member is selected and the Send This Member's Status button is selected the status email will be sent the member will still get a status email.
- Exclude Cal Reminders - Check this box and the member will not receive an calendar reminder emails.
- Exclude Emergency - Check this box and the person will not be included in the Emergency Info list.
Print Reports (button) - Allows you to print member reports such as member roster, emergency contact information and certification status Reports. You can specify the print order by Name or Unit, and this report respects the currently filtered Show Only settings.
Export Member Data (button) - This button exports the entire Member Database to a CSV file, including Active, Non-Active, and Guest Members. The exported file can be opened in a spreadsheet program such as Excel or imported into some other database. It contains member contact information, as well as certification and expiration data. The Export Member Data button is only available for system administrators or members who have Export/Import Member Data level access. If your team does not use the member picture feature, the export is a CSV file. However if you do use member pictures, the exported file is a Zip folder containing member pictures and the CSV file. The CSV file must be extracted from the Zip folder before it can be imported into another Mission Manager team file. Exporting your team members is an easy way to share your members to another team as Guest Members for a mutual aid type of incident.
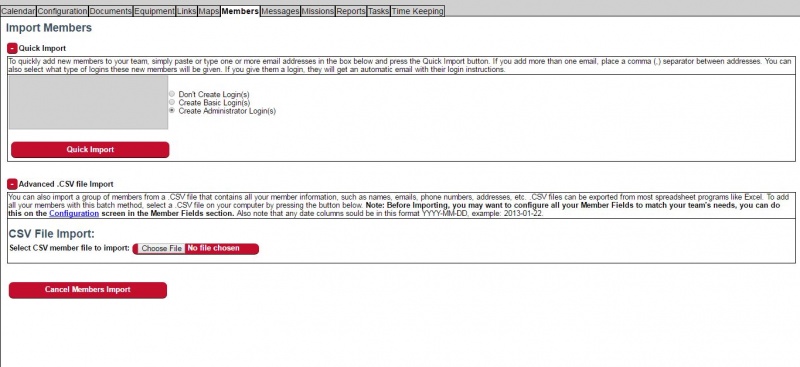
Import Member Data (button) - This button allows the importing of members into Mission Manager from a CSV file. This is extremely helpful and time efficient for those that already have their members in some other database or spreadsheet. It would also allow a Mission Manager team to import another Mission Manager team as guest members. To accomplish that, add a column to your CSV file labeled 'Guest Member' and paste the word 'Yes' down the entire column. The information that can be imported into Mission Manager is member contact information, as well as certification and expiration data. The Import Member Data button is only available for system administrators or members who have Export/Import Member Data level access.
There are two options for importing. The first is Quick Import, which allows for creation of member records by entering a list of email addresses separated by commas. This method would necessarily involve visiting each new member record and filling in the member information.
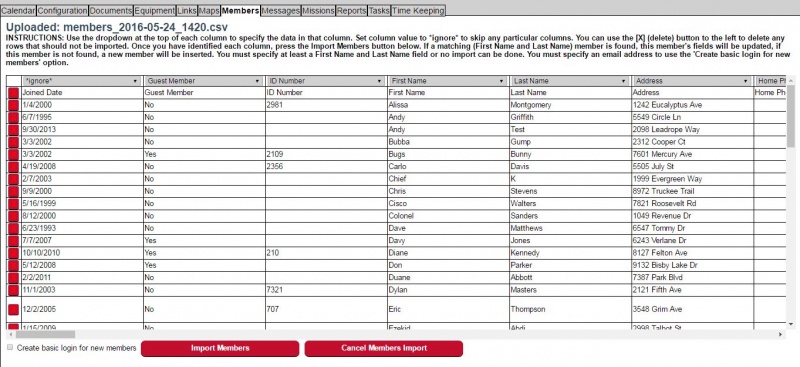
The other method is the Advanced .CSV File Import. To use, click the [+] button next to that description. You'll then need to choose a CSV file on your computer. Mission Manager will present you with a screen to align the data from your CSV file with the fields you set up in Mission Manager via the Configuration screen. At the top of the data columns, there is a dropdown box to choose which field in Mission Manager the associated column data should import to. If your CSV column headers match a Mission Manager field, Mission Manager will automatically select that as the correct field for importing the data. Please review the column headers to be sure the data matches. If a column header reads *ignore*, Mission Manager will skip that column of data. If that is not desired, click on the column header and choose the appropriate field to import to. Two of the columns must specify at least a First Name and a Last Name for the import to continue. If Mission Manager identifies an existing record with the same first and last names as someone you are importing, Mission Manager will update the existing record rather than create a new record.
There is a choice to 'Create basic login for new members'. If this box is checked, those members in the CSV file who have an email address will be sent an email with login instructions as a Basic member.
When you are ready to proceed, click the Import Members button. Mission Manager will summarize the import and detail how many new members were added as well as how many members were updated.
Delete (button) - The delete button erases the member from your database. Use caution! Once a member is deleted you cannot un-delete them. Rather than deleting a member, we would suggest changing their Status to one of the non-active choices, such as Resigned, Retired, Terminated, etc. That way you can still access their records, including past Timekeeping. Change their status in the Certifications and Expirations section of their Member record.
Search - The intent of the search feature is for anyone in your team to get basic contact information for anyone else on the team. The new "Open" button will only open other members that the person searching has permissions to access.
The following video gives an overview of the Members Screen:


